Detectron2はFacebook AI Research (FAIR)が開発している物体認識のフレームワーク.Pytorch上で実装されていて,読み込むモデルを切り替えるだけで,物体検出/人物姿勢推定/セマンティックセグメンテーション/インスタンスセグメンテーション/パノプティックセグメンテーションなどを動かすことができる.
以下のページに,Detectron2のModel Zooを全部試すコードが載っていたので試してみた.
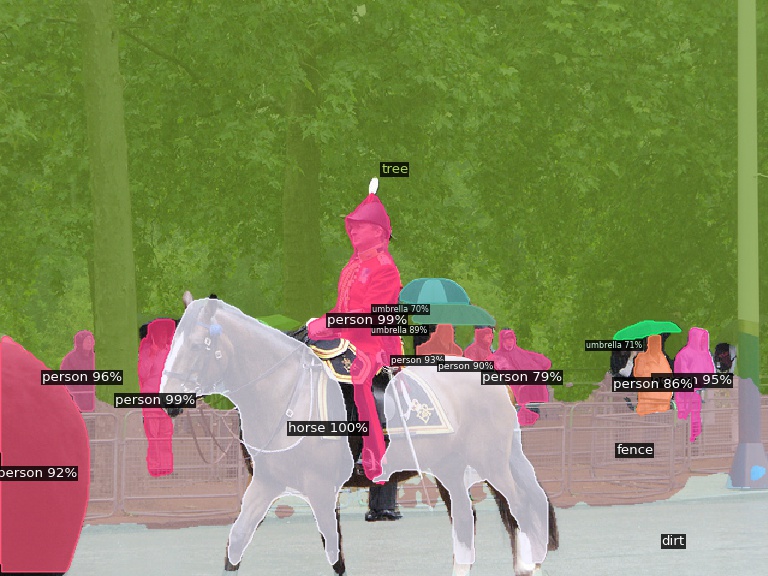
Detectron2のModel Zooで物体検出、インスタンスセグメンテーション、姿勢推定
Detectron2のバージョンが上がったのか,そのままでは動かなかったので,Detectron2のコードを見ながら一部改変.
環境構築はDetectron2のチュートリアルと同様だが,最近はvenvを使っているので以下の通り.
# venv自体の設定
sudo apt install python3-venv
python3 -m venv .venv
source .venv/bin/activate

# detectron2環境の設定
pip install pyyaml==5.1
pip install torch==1.8.0+cu101 torchvision==0.9.0+cu101 -f https://download.pytorch.org/whl/torch_stable.html
pip install detectron2 -f https://dl.fbaipublicfiles.com/detectron2/wheels/cu101/torch1.8/index.html
これは,Detectron2で学習までしようと思ったときの環境設定で,学習をしないのであれば最新のpytorchでも動くはず.
学習は最新のpytorchでは動かないので,RTX3090のようなCUDA11系が必要なGPUでは動かないので注意.今回のコードはRTX3090でも動くが,その場合はtorch==1.9.0+cu111 torchvision==0.10.0+cu111を入れておく.
以上の準備をした上で,Model Zooのモデルを片っ端から試すコードは以下の通り.
#!/usr/bin/env python
# -*- coding: utf-8 -*-

from pathlib import Path
from detectron2.data import MetadataCatalog
from detectron2.engine.defaults import DefaultPredictor
from detectron2.data.detection_utils import read_image
from detectron2 import model_zoo
from detectron2.model_zoo.model_zoo import _ModelZooUrls
from detectron2.config import get_cfg
from detectron2.utils.visualizer import Visualizer

img_path = "input.jpg"
Path("out").mkdir(exist_ok=True)
img = read_image(img_path, format="BGR")

for i, config_path in enumerate(_ModelZooUrls.CONFIG_PATH_TO_URL_SUFFIX.keys()):
    # rpnとfast_rcnnは可視化対応していないので飛ばす
    if "rpn" in config_path or "fast_rcnn" in config_path:
        continue

    # config設定
    cfg = get_cfg()
    cfg.merge_from_file(model_zoo.get_config_file(config_path + ".yaml"))
    cfg.MODEL.WEIGHTS = model_zoo.get_checkpoint_url(config_path + ".yaml")
    score_thresh = 0.7
    cfg.MODEL.RETINANET.SCORE_THRESH_TEST = score_thresh
    cfg.MODEL.ROI_HEADS.SCORE_THRESH_TEST = score_thresh
    cfg.MODEL.PANOPTIC_FPN.COMBINE.INSTANCES_CONFIDENCE_THRESH = score_thresh
    cfg.freeze()

    # 検出&可視化
    predictor = DefaultPredictor(cfg)
    visualizer = Visualizer(
        img[:, :, ::-1], MetadataCatalog.get(cfg.DATASETS.TRAIN[0]), scale=1.2
    )
    predictions = predictor(img)
    if "panoptic_seg" in predictions:
        panoptic_seg, segments_info = predictions["panoptic_seg"]
        vis_output = visualizer.draw_panoptic_seg_predictions(
            panoptic_seg.to("cpu"), segments_info
        )
    else:
        if "sem_seg" in predictions:
            vis_output = visualizer.draw_sem_seg(
                predictions["sem_seg"].argmax(dim=0).to("cpu")
            )
        if "instances" in predictions:
            instances = predictions["instances"].to("cpu")
            vis_output = visualizer.draw_instance_predictions(predictions=instances)

    # ファイル出力
    dataset_name, algorithm = config_path.split("/")
    algorithm = algorithm.split(".")[0]
    vis_output.save(f"out/{i:02d}-{dataset_name}-{algorithm}.jpg")
注意点としては,Model Zooの学習済みモデルを片っ端からダウンロードしてくるので時間がかかる.